Multi-Up Signatures For Web Presses
Multiple Covers/Folds on a Web Signature
Web presses are very versatile printing machines that can be configured in many different ways. It is often necessary to put multiple signatures on a single form to increase productivity. These require a little thought to setup, and a knowledge of how the signatures will be imposed on the form. IQ provides the tools to make this happen.

Use Single Run Quantity and Impositions Blocks, not the Calculation Method for Web forms.
Example 1: 2 x 4 page covers up on the same signature.
Specifications for the example job:
- 2 versions of a 4 page cover that are to be printed together on the same section.
- A 4page fold is selected, and 4 pages are chosen
- The cover size is 8 inches x 9.5 inches (203.2 mm x 241.3 mm)
Choosing the Stock:
- The web roll size is 17.5 inches (444.5mm) with the cut off of 22.75 inches (577.85 mm)
- The Roll is picked by engaging the wrench on the stock size:

*The stock size needs to be setup correctly similar to this example:
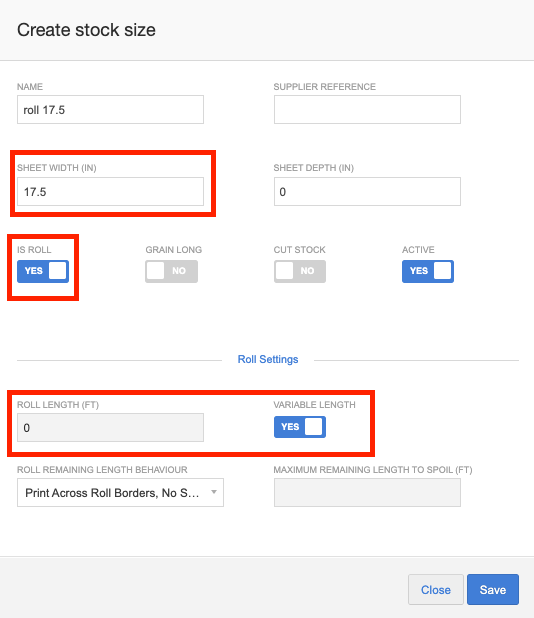
The sheet size is the roll width
The sheet depth is set to ZERO as the IS ROLL button is checked.
The roll length is either entered, or the roll is set to VARIABLE LENGTH
The specifications of the press:
- Typically the press which will be used is chosen in the Production Method of the section on the quote.
- The web press has a cylinder that is 36 inches wide x 22.75 inches deep (914.4 mm x 577.85 mm)
The Multiple Run Breakdown
- The breakdown of the print run (an English and Spanish version each with 70,000 pieces)
- The Advanced Quantity Mode is engaged
- Versions (Press Form Runs) is clicked, and Per Section is engaged, with both Forms being selected.
Note: versions has been renamed to press form runs in the
Admin -> Configuration -> Customize -> Settings -> General -> Global area of IQ
Admin -> Configuration -> Customize -> Settings -> General -> Global area of IQ
Engaging the Imposition Block
- The imposition block is engaged by clicking the wrench/spanner:
- Imposition Block is checked.
- The number up of impositions on the form is chosen (in this case 2)
- The size of the a "two-up layout" is entered (the size of the laid out form)
- The number of 4p covers within the imposition is entered (ie. a 4page cover would be 1 across x 2 down - ie. around the cylinde) - this is also used for dies where you might have multiple up on the "block"
- Single Run Quantity is checked
This will produce a run down of the two versions:
Checking the Print Layout
Once the setup is done, and all the necessary section, side and job finishing operations are added, the quote is UPDATED and the results will display:
Clicking the + button on the print area will roll down the printing details:
- The BLOCK LAYOUT is 1x2 (ie. two 4p covers)
- The BLOCK SIZE is the flat size of two 4p covers
- The BLOCK NUp is the number of "blocks" (or 4p covers) on the form (ie. 2up 4p covers on the form).
- The FINISHED SHEETS is the total cutoffs required.
- The NET SHEETS are the total cutoffs including waste.
- Because there are two versions of covers, 70,000 English + 70,000 Spanish there are a total of 140,000 covers. They are printing 2up (one of each) so there are 70,000 finished sheets
The layout looks as follows:
Example 2: 2 x 8p double parallel fold pieces on the same signature
Specifications for the example job:
- 2 versions of an 8 page double parallel fold that are to be printed together on the same section.
- A 08page double parallel fold is selected, and 8 pages are chosen
- The page size is 8.125 inches x 10.625 inches (206 mm x 270 mm)
Choosing the Stock:
- The web roll size is 22 inches (559 mm) with the cut off of 22.75 inches (577.85 mm)
- The Roll is picked by engaging the wrench on the stock size:
The specifications of the press:
- Typically the press which will be used is chosen in the Production Method of the section on the quote.
- The web press has a cylinder that is 36 inches wide x 22.75 inches deep (914.4 mm x 577.85 mm)
The Multiple Run Breakdown
- The breakdown of the print run (an English and Spanish version each with 50,000 pieces)
- The Advanced Quantity Mode is engaged
- Versions (Press Form Runs) is clicked, and Per Section is engaged, with both Forms being selected.
Engaging the Imposition Block
- The imposition block is engaged by clicking the wrench/spanner:
- Imposition Block is checked.
- The number up of impositions on the form is chosen (in this case 2)
- The flat size of the a "two-up layout" is entered (the size of the laid out form)
- The number of 8p double parallels within the imposition is entered (ie. a would be 1x1) - this is also used for dies where you might have multiple up on the "block"
- Single Run Quantity is checked
This will produce a run down of the two versions:
Checking the Print Layout
Once the setup is done, and all the necessary section, side and job finishing operations are added, the quote is UPDATED and the results will display:
Clicking the + button on the print area will roll down the printing details:
- The BLOCK LAYOUT is 1x2 (ie. two 8p double parallels)
- The BLOCK SIZE is the flat size of two 8p double parallels
- The BLOCK NUp is the number of "blocks" (or 8p double parallel) on the form (ie. 2up 4p covers on the form).
- The FINISHED SHEETS is the total cutoffs required.
- The NET SHEETS are the total cutoffs including waste.
- Because there are two versions of covers, 50,000 English + 50,000 Spanish there are a total of 100,000 8p double parallel forms. They are printing 2up (one of each) so there are 50,000 finished sheets
Related Articles
PRESSES - Setup and configure
If you are setting up a new press or need to alter the configuration on an existing press, this is managed under Admin > Configure Factory > Equipment > Presses. This takes you to the 'Manage Presses' screen. Here you can see the list of all current ...Sheeting on a Web Press with a Fixed Cut-Off
Sheeting on a web press requires setting up another version of the Web Press (like we would Sheet Work, Work&Turn, Work&Tumble on an offset press). This is intended for a web press with a fixed cut-off. The goal is to create version of the press as ...printIQ Infrastructure and Web Hosting Requirements
Infrastructure and web hosting Overview Infrastructure and web hosting printIQ is a suite of web based applications that can be combined to provide a custom solution for each individual instance. The following information provides an overview of how ...Multi Site setup
To print or download this document click here Multi Site Setup You must have a master ‘FACTORY” and create the ‘sites’ required as additional sites. Upload all customers to these additional ‘sites’. MASTER is for pricing access only: USER ...Multi-Factor Authentication (MFA) – Setup, Configuration and User Enrollment
MFA – Multi Factor Authentication Multi-factor authentication is an electronic authentication method in which users are granted access to printIQ after successfully entering their authentication code from an authentication application on their ...