Specialist
- Paul van Tongeren
Introduction
The integration to HyperSage is primarily a push from printIQ.
This is a manual process requiring the user to export from within a record or to select multiple records from the appropriate area and click the export button to begin the push of the selected records.
When multiple records are selected the number is shown in brackets as shown.
printIQ sends data for the following touchpoints:
- Customer
- Customer/Debtor Invoices
- Vendor/Supplier
- Supplier Invoice (from Purchase Order)
Payments can also be checked from within the invoicing windows, this will query Sage via the integration to check if the record is marked as paid.
It will also return the balance paid back to the printIQ invoice dashboard.
A record of the payment transaction will be shown within the invoice.
HyperSage Integration Setup
The integration for HyperSage is stored on the printIQ Plugins database, integration staff will need to add the site instance, similar to other integrations.
This improves the customer service by not requiring customers to have their instance patched before they are able to integrate with HyperSage.
Once the initial connection is carried out to the Plugins database, the integration lead will be able to configure the HyperSage details within the printIQ instance.
PLEASE NOTE:
During setup Hyperext will only instruct the customer to Whitelist the IP address for their office, any other IP Addresses will be blocked.
Please advise the customer's IT provider to whitelist the printIQ plugins server IP address 13.70.139.252 on ports 40027 & 50027 (Ports may vary by setup)
The following details will be required from the customer:
- HyperSage URL (Endpoint where API requests are made, provided by HyperSage)
- Auth Header Key (Auth Header Key provided by HyperSage)
- Author Header Value (Auth Header Value provided by HyperSage)
- Stock Code (This is the value pushed into HyperSage as the Product Code)
This information will need to be input into the “External System Admin” as shown:
printIQ setup required for HyperSage
Prior to setting up the integration to HyperSage, there are several setup tasks required within the printIQ instance to ensure a seamless integration to Sage.
Should any of these items not be configured then any items exported will fail. In the case of a failure an error message will be shown to assistance the user in rectifying the issue,
once corrected the export will need to be initiated again.
The printIQ build lead should ensure the following items are setup and match to Sage to ensure failures do not occur and duplicate records (in the case of customers) are not created within Sage.
These will be covered in the further pages within this documentation but items such as Nominal codes and Tax Types will need to match.
Customer records that are imported into printIQ should also have the same details and account code as shown in Sage. In the case of customers,
if an account code does not match then a failure on export will occur.
Customer Records within printIQ
There are a number of fields required to be filled within printIQ to allow a customer record to be successfully pushed to Sage.
The connection is only export at this stage so initial customer records will need to be exported from Sage and imported into printIQ using our default CSV templates.
Field that are required in a customer record are:
- Customer Name
- Customer Code (This can be no more than 8 Characters long)
- Account Manager
- Tax Type (This record must be contained in Sage)
- Default Currency (If this is not the local currency then this must be enabled in Sage first)
- Credit Terms (This is pushed as a note, Terms must be agreed in Sage)
- Billing Address
- Delivery Address
- A minimum of one contact record is required
Once this information is populated in the customer record, the user can now click the Export button on the top header to Push the newly created record into Sage.
Tax Type Mapping
Tax Types must exist in both Sage and printIQ. When a Tax Type is used within printIQ we will send a request to HyperSage to check that the Tax Type exists.
This is matched using the Tax Type field in printIQ to the Description contained within Sage.
We will then use the Code ID when exporting, this is due to Sage expecting the ID and not the name of the code.
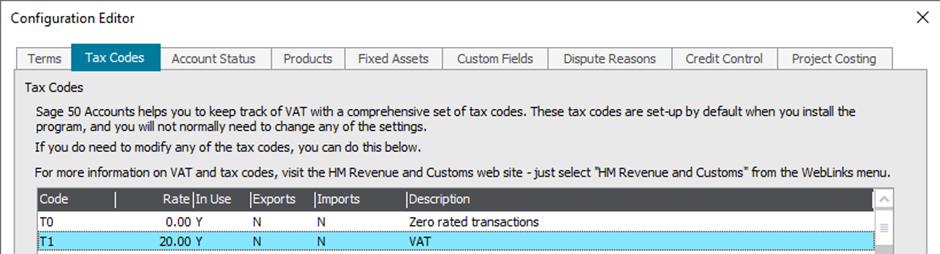
Tax Codes within printIQ can be found under Accounts -> Tax Types
Tax Codes within Sage can be found under Settings -> Configuration -> Tax Codes
Nominal Code (Tax Code) Mapping
Nominal Codes (or Tax Code in Sage) must match between printIQ and Sage, should a code not exist the invoice will export but it will not post automatically so will not be updated within the Ledger.
During the initial integration stages, the printIQ build lead should ensure all Nominal Codes within printIQ must match to those configured within the customers Sage instance.
Current printIQ Nominal codes can be accessed from Accounts -> Account Codes
Sage Nominal Codes can be found under “Nominal Codes” located along the left-hand menu
All Nominal Codes can be exported from Sage into an Excel Form using the button contained on the top menu, this can be formatted into the printIQ CSV import to allow easy import of all nominal codes.
Credit Terms
Credit Terms are passed from printIQ as a text string to the Trading Terms Text, this is located within the customer record, under the Credit Control area.
Before invoices can be automatically posted into Sage from printIQ. The Credit Terms for each new customer must be agreed,
the user will need to go into the customer record and set the “Payment Due” and “Payment Due” from options and finally click the “Terms Agreed” button located at the bottom of the window.
Sales + Supplier Invoices
printIQ will push invoices to Sage either in bulk or by clicking the export button contained within the invoice record.
Bulk exports can be carried out by selecting multiple records within the Invoice Screen as below:
The number of records selected is shown on the export button to ensure extra invoices are not selected by accident.
Invoices must be approved before they can be exported. Once successfully exported the Status on the invoice line will show as Sent.
If exported as part of a batch, a batch name will be shown, containing the time and date of export.
Invoices can be individually exported by opening the invoice record and clicking the export button shown next to the Print Button
Once successfully exported the invoice can be found under “Invoices and Credits”, once opened it will be shown as below:
To successfully export invoices to Sage a number of items must match to prevent an export error:
- The customer must exist within Sage
- The Tax Type(s) must match to those in Sage
- Nominal Codes must match (Invoices will still export but fail to automatically post)
These elements must be checked and setup prior to any exports are carried out.
Checking for Payments within printIQ
Payments can be checked from within the invoicing windows, this will query Sage via the integration to check if the record is marked as paid,
it will also return the balance paid back to the printIQ invoice dashboard.
To check the payment status of multiple invoices, the user will need to highlight all invoices that they would like to check payment on,
using the check boxes on the left of each invoice record. Once selected the user will need to click the “Check for Payments” button:
A record of the payment transaction will be shown within the invoice.
Some Limitations do exist within Sage that should be noted
Invoice numbers (Int) within Sage have a limited of 7 Characters.
We pass the printIQ Invoice ID into this field. Should the printIQ invoice number be passed over, a confliction may occur with Supplier Invoices.
We do pass over the printIQ invoice number, this is passed into the Customer Order Number field within Sage.
This field is optional and has a limit of 60 Characters.
Customer Account Codes are passed into the Sage Customer Account Ref field (String),
there is a limited of 8 characters within Sage so any customer records within printIQ must adhere to this limited.
The Order Number (String) field within Sage will contain one of the following: the First Job Number on the Invoice, the First PO Number on the invoice, the Quote Contact or be Blank.
This has a limit of 7 characters and can automatically be set within the printIQ Global Settings under:
printIQ -> HyperSage Scheme Mapping
Customer Record Mapping between Sage & printIQ
Sage Mapping | printIQ Mapping |
Name (max 60 chars) | Name |
Address1 (max 60 chars) | AddressLine1 |
Address2 (max 60 chars) | AddressLine2 |
Address3 (max 60 chars) | AdrCity |
Address4 (max 60 chars) | AdrPostCode |
Address5 (max 60 chars) | AdrCountry |
CountryCode (max 2 chars) | AdrCountry – Lookup Region Code |
ContactName (max 30 chars) | Billing Contact FirstName & LastName |
Telephone (max 30 chars) | Phone |
DeliveryAddress1 (max 60 chars) | AddressLine1 from Default Delivery Address |
DeliveryAddress2 (max 60 chars) | AddressLine2 from Default Delivery Address |
DeliveryAddress3 (max 60 chars) | AdrCity from Default Delivery Address |
DeliveryAddress4 (max 60 chars) | AdrPostCode from Default Delivery Address |
DeliveryAddress5 (max 60 chars) | AdrCountry from Default Delivery Address |
Email (max 255 chars) | Email |
DefNomCode = 0 | Hard code to 0 |
DefTaxCode | Tax Type is checked in Sage and converted to ID required by Sage |
Terms (max 30 chars) | Credit Terms |
Currency | Currency Code is checked in Sage and converted to ID required by Sage |
Analysis1 | N/A |
Analysis2 | N/A |
Analysis3 | N/A |
DeptNumber | Hard Coded to 0 |
PaymentDueDays | Hard Coded to 0 |
Inactive Account | If Customer is active, IsActiveFlag is passed as true |
AccountRef | AccountNo/CustomerCode
|
Supplier Record Mapping between Sage & printIQ
Sage Mapping | printIQ Mapping |
Name (max 60 chars) | Name |
Address1 (max 60 chars) | AddressLine1 |
Address2 (max 60 chars) | AddressLine2 |
Address3 (max 60 chars) | AdrCity |
Address4 (max 60 chars) | AdrPostCode |
Address5 (max 60 chars) | AdrCountry |
CountryCode (max 2 chars) | AdrCountry – Lookup Region Code |
ContactName (max 30 chars) | Billing Contact FirstName & LastName |
Telephone (max 30 chars) | Phone |
Email (max 255 chars) | Email |
Terms (max 30 chars) | Credit Terms |
Currency | Currency Code is checked in Sage and converted to ID required by Sage |
Inactive Account | If Customer is active, IsActiveFlag is passed as true |
AccountRef | AccountNo/CustomerCode
|